Installing Your Rowing System in the Oxford Wherry
Rigging Your Oxford Wherry for Rowing
The Oxford Wherry is a very versatile boat, and can be rigged in several configurations, both for fixed seat rowing and sliding seat rowing. Below we discuss the pros of each and provide details for setting your boat up with the system you choose. You can rig your boat for more than one system, and below we discuss the various possibilities.
Fixed Seat Rowing:
 The big advantage of fixed seat rowing is simplicity and low cost. For about $150 you can purchase the oars, oarlocks, and miscellaneous items required to get rowing. The drawback is it is not as fast as sliding seat rowing and doesn’t give you a full-body workout. The best position to row from is near the center of the boat, so you will need to install a seat over the center bulkhead/frame. The kit does not include this seat (since many won’t be using it), but it is easily constructed from a 3/4” thick piece of cedar and epoxied in place. Alternatively, for versatility, angled blocks can be glued to the hull supporting the ends of the seat. This allows the seat to be removed if you wish to use a sliding system as well. For maximum efficiency the oarlocks need to be placed slightly outboard, and this is achieved with a simple pair of small riggers bolted to the boat.
Sliding Seat Rowing:
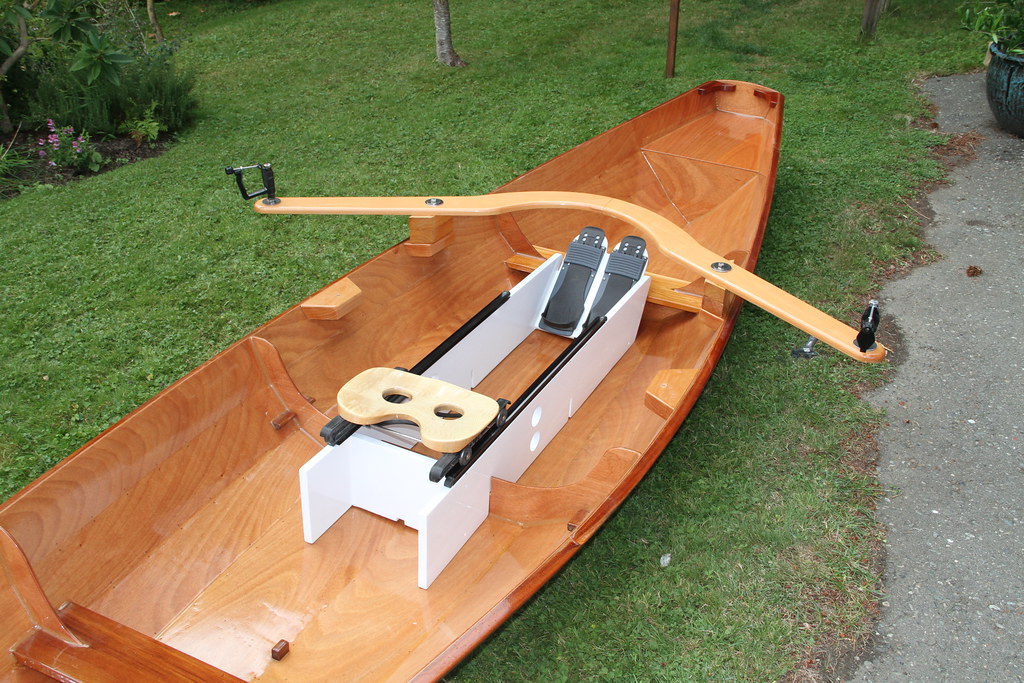
The advantage of sliding seat rowing is it is faster and offers a full-body workout. The full cost of a sliding seat system, including the oars is anywhere from $600 and up. A central seat is not required in the boat if you’re using a sliding system as the sliding seat frame will be placed in this location.Click on the image below to see a photo gallery of the sliding seat and fixed seat Oxford Wherry rigged for rowing.
Placement of the Sliding Rowing Station
The ideal location of the rowing station is generally near the center of the boat, but it can vary depending how you plan on using the vessel. The overall objective is to have the center of gravity (total weight of boat, rower, gear and passengers) just aft of center. If rowing solo, the ideal location of the rowing station is slightly behind the center of the boat. If carrying one passenger, ideal trim is achieved by having the rowing station further forward to balance the weight of the passenger sitting on the rear seat. If carrying multiple passengers and/or heavy gear either rowing position can be used, and the boat balanced accordingly by appropriately positioning of passengers and cargo.It is possible to have your boat set up with mounts for two rowing locations, however, this does add slightly to weight and complexity. Alternatively, you can set the rowing station mounts in the position you will require most frequently, and put up with slightly reduced performance in situations where the passenger weight distribution is not ideal. Since the beam of the boat varies along its length, having two rowing stations means two sets of mounting holes need to be drilled in the rigger. We discuss these particulars later in our instructions. If you are using the Piantadosi rig, this will not apply to you.
Our rigger/sliding seat kits for the Oxford Wherry provide one set of mounting blocks with the bonding face angled to be mounted for central rowing. If you wish to add a second set of mounting blocks, they can be cut easily with a table saw or miter saw with directions below.
Installing the Angus Sliding Seat System in the Oxford Wherry
Please refer to our photo gallery above for further information.
After completing assembly of the sliding seat frame and riggers and mounting the hardware according to instructions, the next step is to secure the system to the boat. Both the sliding seat frame and the rigger system need to be secured to the vessel.
Installing the Sliding Seat Frame
 The sliding seat frame sits over the central bulkhead/frame of the boat. The frame is accommodated by cutting slots into both frames so it can rest upon the bottom of the boat. These slots are cut equally in both the slider frame and the boat frame/bulkhead (please refer to pictures in slideshow). The width of the slot in the slider frame should be the thickness of the bulkhead (just over 6 mm) and the slot in the bulkhead should be the thickness of the slider frame (just over .75”). Each slot should extend 2.5” vertically. Refer to figure A to see positioning of slots in the frame for both rowing positions. Position “A” is for rowing solo and “B” is the ideal spot when you’re carrying one passenger. Multiple passengers can generally be accommodated in either position through strategic weight distribution.
  The slots in the boat frame should be centered so they are equidistant from each side, and spaced the exact width of the sliding frame (use the frame as a guide). The bottom of the slots in the slider frame will need to be rounded to accommodate the boat fillets.
Once the frame slots smoothly into position, use a block plane to shave a small amount of wood from the slider frame so it conforms to the slight curve of the hull.
When slotted snugly to the boat, the sliding seat frame will be braced from moving back and forth when in use, however, it is still possible for it to twist left or right. To prevent this, a small block can be epoxied to the boat, and a corresponding notch slotted into the frame. In the solo rowing position, the block will be slotted into the footbrace cross beam. If also configured for carrying a passenger it will notched in the forward cross beam (view images in slideshow for clariffication) This system allows for quick removal of the sliding seat frame. Alternatively, a more secure system can be used by bolting the frame to blocks epoxied to the boat. The notch system required blocks which are ¾ x 1" x 1.25".
If you wish to be able to accommodate a passenger with good trim, cut a second slot at 28 inches from the forward edge of the sliding seat frame (see figure A).
Installing the Rigger
 The sliding seat rigger is affixed to the boat by being bolted to two mounting blocks epoxied to the hull. If you wish to regularly carry a passenger, you will likely want to create a secondary mounting position further forward on the hull (see figure C)
The blocks for mounting station A are slightly narrower than mounting station B (see figure B). This is to accommodate for the varying hull width. A second set of holes still needs to be drilled in the riggers, however, this allows them to be drilled close enough so that the second set will be hidden under the fender washer (for aesthetics). Refer to figure A for dimensions when cutting mounting blocks. The blocks provided with the kit should be mounted in A location.
Check that the angles are correct prior to mounting. Refer to figure C to see where they should be mounted. Sand the hull prior to bonding and secure with thickened epoxy and secure with wood clamps. A straight edge held across the boat can be used to ensure the blocks are perpendicular to the boats vertical axis.
Next, drill holes for the mounting bolts in the riggers using a 3/8” inch bit (refer to Figure D). For the solo rowing position, the holes should be drilled 17.5” from the center of the oarlock bolt holes. Center these holes across the width of the rigger. If you are installing dual rowing positions, drill a second set of holes 16.5” from the oarlock bolt holes.
3” spacer blocks are required to lift the riggers to the correct height. These can be cut from single pieces of 3” thick wood or 2 layers made from 2x4s. They should be cut to the same dimensions as the top surface of mounting block A.
After the mounting blocks have been affixed and excess epoxy sanded off, the final holes for the rigger mounts can be drilled. Place the spacer blocks on the mounting blocks followed by the rigger. Center the rigger, and make sure it is perfectly in position. Temporarily clamp it in position, and check measurements once again and then drill straight through the blocks of wood with a 3/8th bit. The riggers can then be bolted into position with 3/8” bolts and tee nuts or regular nuts and fender washers. If you installed the two position mounting system, the second hole in the rigger can be covered (for aesthetics) by adding a larger ½” fender washer.
 Final Note: The height of the sliding seat frame is set for maximum comfort. For slightly better performance and to lower your center of gravity, it can be lowered slightly. Prior to assembly, use a table saw to trim the side panels and rear cross brace to a width of 6” and then assemble. You will then only need 1.5” spacers to raise the riggers to the appropriate height above the seat.
Assembly of a Fixed Seat Rowing System for Oxford Wherry
- Affix mounting blocks flush with the top of the hull. These are made from cedar 2x4’s. The angle where the bonding edge should be cut at 24 degrees so when mounted they sit perpendicular to the boat’s axis. The blocks are the same as those used for the sliding rigger system, so please refer to detailed instructions for mounting blocks “B” below in the sliding seat section (Figure B).
- Use template to trace and cut out pieces for oarlock riggers. Cut the pieces out from 1” thick cedar and epoxy/clamp parts one and two together. Use stir sticks to create neat fillets in the inside corner of the two pieces. After epoxy cures, sand off excess epoxy and round edges.
- Install mounting plate for the oarlocks. Make sure to purchase flat oarlock mounting plates (as opposed to the ones mounted on corners). The edge of the plate should be set in 1 cm from the inside edge of the top block and centered.
- Secure the riggers to their respective mounting block using two bolts or one bolt and two screws on either side. The photo in the slideshow illustrates just one bolt, however, it is preferable to have two connection points to prevent pivoting.